How to Season a New Moka Pot Properly: Complete Guide
Never skip seasoning a new moka pot. Without proper seasoning, your first several brews will taste metallic, bitter, and unpleasant due to manufacturing oils and aluminum residue. This complete guide shows you the exact 5-step process to season your moka pot correctly, eliminating metallic taste and preparing it for perfect coffee.
Quick Answer
To season a new moka pot: wash once with soap to remove manufacturing oils, then brew and discard 3-5 batches of cheap coffee. Between brews, rinse with water only (no soap). After 3-5 cycles, the metallic taste disappears and a protective coffee oil coating forms. Total time: 2-3 hours. Use old/cheap coffee for seasoning - don't waste good beans.
Why Seasoning Your Moka Pot Is Essential
What Happens Without Seasoning
When you skip seasoning, you'll experience:
- Metallic taste: Aluminum leaches into coffee, creating a tinny, unpleasant flavor
- Manufacturing residue: Oils, metal shavings, and production chemicals contaminate your coffee
- Chemical smell: Industrial odors from warehouse storage and packaging
- Bitter, harsh coffee: Oxidized aluminum compounds create astringent flavors
- Wasted beans: Your first 5-10 brews will taste bad regardless of coffee quality
Many people buy a moka pot, skip seasoning, brew terrible-tasting coffee, and conclude that moka pots make bad coffee. The problem isn't the moka pot - it's the lack of seasoning.
How Seasoning Works
Seasoning creates a protective layer through this process:
- Coffee oils coat the interior: Natural oils from coffee beans polymerize (bond) to the aluminum surface
- Patina forms: A thin, brownish layer develops that acts as a barrier between aluminum and water
- Aluminum stops leaching: The protective coating prevents aluminum ions from entering your coffee
- Flavor improves: Coffee tastes clean and pure without metallic interference
- Maintenance becomes easier: The seasoned surface resists oxidation and staining
This is similar to seasoning cast iron cookware - you're building up beneficial layers that improve performance over time.
Aluminum vs Stainless Steel: Different Needs
| Factor | Aluminum Moka Pot | Stainless Steel Moka Pot |
|---|---|---|
| Seasoning Required | Yes (essential) | Yes (recommended) |
| Number of Brews | 3-5 cycles | 2-3 cycles |
| Metallic Taste Risk | High without seasoning | Low to moderate |
| Visible Patina | Yes (brown coating) | Minimal |
| Primary Purpose | Prevent metal leaching | Remove manufacturing residue |
| Maintenance | Never use soap | Can tolerate occasional soap |
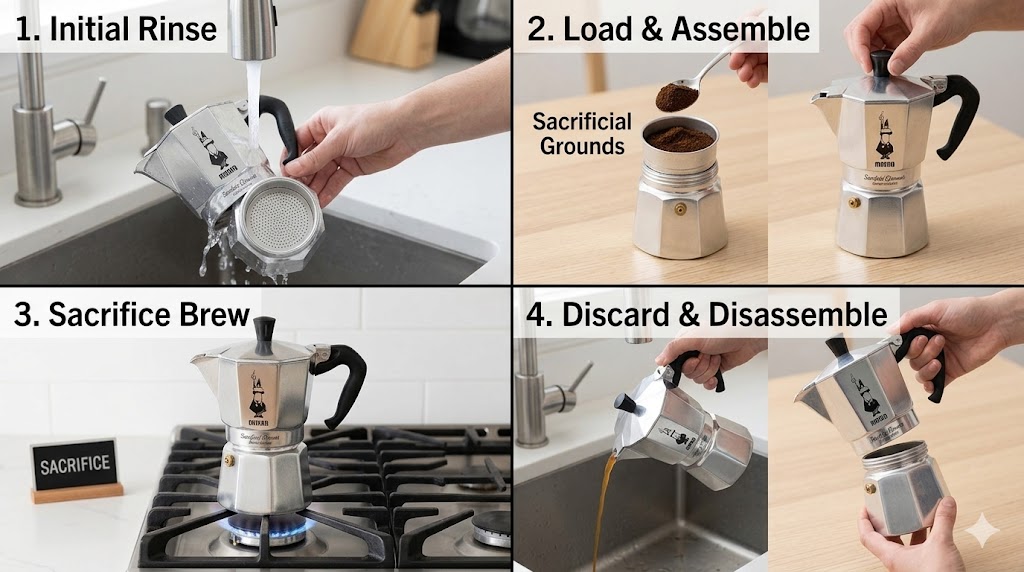
Step 1: Initial Wash (Soap Only This Once)
This is the only time you'll ever use soap on your moka pot.
Complete Disassembly
- Unscrew the top chamber from the bottom chamber
- Remove the filter basket from the bottom chamber
- Remove the rubber gasket from the underside of the top chamber
- Unscrew the filter plate from inside the top chamber
- Check for any loose parts or packaging materials
Washing Process
- Use warm water and mild dish soap: Apply a small amount of soap to a soft sponge
- Wash each component thoroughly:
- Bottom chamber (inside and outside)
- Top chamber (inside and outside)
- Filter basket (all sides and bottom)
- Filter plate (both sides)
- Rubber gasket (gently - don't stretch)
- Pay special attention to: Safety valve area, threads, and any corners where residue accumulates
- Rinse exhaustively: Rinse each part under running water for 30+ seconds to ensure no soap residue remains
- Dry completely: Use a clean towel or air dry for 30 minutes
Critical: This is the LAST time you will use soap on the interior of your moka pot. After seasoning, soap will strip away the beneficial coffee oil coating and force you to re-season. From this point forward, use only water for cleaning.
Step 2: Safety Check Before Seasoning
Before your first brew, verify that all safety components function properly:
Safety Valve Inspection
- Location: Small metal valve on the side of the bottom chamber
- Test: Push it gently with your finger - it should move in and spring back out
- Purpose: Releases pressure if the pot gets blocked, preventing explosions
- Problem signs: Valve doesn't move, feels stuck, or has visible blockage
Rubber Gasket Check
- Location: Circular rubber ring inside the top chamber's underside
- Inspect for: Cracks, tears, deformities, or excessive stiffness
- Proper fit: Should sit snugly in its groove without bulging out
- Replace if: Damaged, dried out, or doesn't seal properly
Filter Plate Verification
- Check holes: All small holes should be clear and unobstructed
- Threading: Filter plate should screw in smoothly and tightly
- Alignment: Must sit flat against the gasket when assembled
Step 3: First Seasoning Brew
Choose Your Seasoning Coffee
Do NOT waste good coffee on seasoning. Use:
- Cheap supermarket pre-ground coffee
- Old coffee that's past its prime (over 4 weeks old)
- Expired coffee you were going to throw away
- Any roast level - doesn't matter
- Even instant coffee works in a pinch
You'll need enough coffee for 3-5 full brews. For a 6-cup moka pot, that's approximately 100-150g total.
Brewing Process
- Fill water chamber: Add filtered water up to just below the safety valve line. Never cover the valve.
- Add coffee grounds: Fill the filter basket completely with coffee. Level it off but don't tamp or compress.
- Assemble carefully: Place filter basket in bottom chamber, screw on top chamber hand-tight (don't over-tighten).
- Brew on medium heat: Place on burner at medium setting (5 out of 10). Leave the lid open to monitor progress.
- Watch for coffee flow: After 4-6 minutes, coffee will start flowing into the upper chamber.
- Listen for the gurgle: When you hear a hissing/gurgling sound and see sputtering, remove from heat immediately.
- Cool the base: Run cold water over the bottom chamber for 10 seconds to stop extraction.
- Discard everything: Pour out all the coffee. Do NOT drink this first batch.
Why discard? The first brew extracts manufacturing oils, metal particles, and aluminum compounds. This coffee may look normal but contains contaminants you don't want to consume. Subsequent brews will be progressively cleaner.
Step 4: Rinse and Repeat (2-4 More Times)
Between-Brew Cleaning
- Let the pot cool: Wait 15-20 minutes until safe to handle
- Disassemble: Unscrew and separate all parts
- Rinse with warm water ONLY: No soap - just water and gentle wiping
- Check filter basket: Tap out old grounds, rinse thoroughly
- Dry completely: Use a towel or air dry for 10-15 minutes
- Inspect progress: Look for brown patina beginning to form inside upper chamber
How Many Times to Repeat
| Brew # | What to Expect | Action |
|---|---|---|
| Brew 1 | Strong metallic smell, possibly oily residue on surface | Discard, rinse well |
| Brew 2 | Less metallic smell, coffee starting to smell more normal | Discard, rinse well |
| Brew 3 | Minimal metallic smell, light brown patina visible inside | Discard, test taste (tiny sip) |
| Brew 4 | Clean coffee smell, patina more developed | Optional - test taste |
| Brew 5 | No metallic taste, fully seasoned | Only if needed |
Most aluminum moka pots are ready after 3 brews. If you still detect metallic taste, continue for 1-2 more cycles.
Step 5: Test and Verify Seasoning
How to Test Your Seasoned Moka Pot
After your 3rd seasoning brew, conduct a taste test:
- Take a tiny sip: Let the coffee cool slightly, then taste a small amount
- Assess the flavor:
- ✅ Ready: Tastes like coffee (possibly weak/bitter due to cheap beans, but no metallic flavor)
- ❌ Not ready: Distinct metallic, tinny taste; aluminum flavor on the tongue
- Check the smell: No chemical or industrial odor when hot
- Visual inspection: Light brown patina visible inside upper chamber
Signs Your Moka Pot Is Properly Seasoned
- No metallic taste when you sip the coffee
- Clean coffee aroma (even with cheap beans)
- Light brown coating visible on interior surfaces
- No industrial smell when pot is hot
- Coffee flavor is clean without tinny aftertaste
First "Real" Brew
Once seasoning is confirmed:
- Rinse the pot one final time with water
- Dry completely
- Load with fresh, quality coffee beans (properly ground)
- Brew following best practices for heat and timing
- Enjoy your first delicious cup!
Your moka pot will continue to improve over the next 10-20 brews as the seasoning layer deepens and matures.
Maintaining Your Seasoning
Daily Cleaning After Each Use
- Let cool completely: Wait 20-30 minutes before handling
- Disassemble: Remove top chamber and filter basket
- Empty grounds: Tap out coffee grounds into trash or compost
- Rinse with warm water: Use only water - no soap, no scrubbing
- Wipe gently: Use a soft cloth for stubborn residue
- Dry thoroughly: Leave disassembled to air dry, or towel dry
- Store unassembled: Keep parts separate to allow airflow and prevent moisture buildup
The Golden Rule of Seasoned Moka Pots
NEVER use soap after seasoning. Soap dissolves the coffee oil layer that prevents metallic taste. If you accidentally use soap, you'll need to re-season with 2-3 more brews. Water alone is sufficient for cleaning - the high brewing temperature naturally sanitizes the pot.
When Deep Cleaning IS Necessary
Occasionally, you may need a deeper clean:
- Safety valve clogged: Soak in hot water, use a toothpick to clear (never use soap inside valve)
- Filter basket clogged: Soak in hot water, use soft brush to clear holes
- Exterior stains: You CAN use soap on the exterior - just avoid interior surfaces
- Rubber gasket smell: Replace gasket if it smells rancid (should be replaced annually anyway)
- Calcium buildup: Descale with 1:1 water and white vinegar solution, then re-season with 1-2 brews
When to Re-Season
You'll need to re-season if:
- You accidentally washed interior with soap
- Metallic taste returns after not using the pot for 6+ months
- You performed aggressive descaling
- The interior patina was scrubbed away
Good news: Re-seasoning only requires 2-3 brews instead of 3-5, since some patina usually remains.
Common Seasoning Mistakes to Avoid
Mistake #1: Using Good Coffee for Seasoning
Why it's wrong: You're discarding 3-5 full pots of coffee - that's 100-150g of beans wasted.
What to do instead: Use the cheapest, oldest, or expired coffee you can find. Save your premium beans for after seasoning.
Mistake #2: Skipping the Initial Soap Wash
Why it's wrong: Manufacturing oils, metal shavings, and warehouse dust remain in the pot, contaminating early brews and interfering with seasoning.
What to do instead: Always wash with soap once before the first seasoning brew. This is the only exception to the "no soap" rule.
Mistake #3: Stopping After Just 2 Brews
Why it's wrong: Two brews isn't enough for most aluminum pots - metallic taste often remains.
What to do instead: Plan for 3-5 brews minimum. Test after the 3rd brew, and continue if metallic taste persists.
Mistake #4: Using Soap Between Seasoning Brews
Why it's wrong: Soap removes the coffee oil layer you're trying to build, forcing you to start over.
What to do instead: Between seasoning brews, rinse with warm water only. Save soap for the exterior if needed.
Mistake #5: Drinking the First Few Brews
Why it's wrong: Early brews contain manufacturing contaminants, metal particles, and aluminum compounds that are unpleasant and potentially harmful.
What to do instead: Discard the first 3 brews completely. Don't taste until brew #3, and even then, only take a tiny sip to test.
Mistake #6: Scrubbing the Patina Away
Why it's wrong: The brown patina is the seasoning - removing it defeats the entire purpose.
What to do instead: Embrace the patina. It's not dirt - it's a protective coating. Clean with water and gentle wiping only.
Alternative: Baking Soda Pre-Treatment
Some coffee enthusiasts use this alternative method before traditional seasoning:
Baking Soda Method
- After the initial soap wash, fill the bottom chamber with water
- Add 1 tablespoon of baking soda to the water
- Don't add coffee - leave the filter basket empty or fill with water
- Brew this solution once
- Discard and rinse thoroughly
- Proceed with normal coffee seasoning (3-5 brews)
Benefits: Baking soda neutralizes acids and helps remove stubborn manufacturing residue.
Drawbacks: Adds an extra step and may not be necessary for most pots.
Verdict: Optional but potentially helpful for very heavily processed or industrial-smelling pots.
Frequently Asked Questions
Do you really need to season a new moka pot?
Yes, seasoning a new moka pot is essential. New aluminum moka pots have manufacturing oils, metal shavings, and residue from the production process that can give your coffee a metallic taste. Seasoning creates a thin protective layer of coffee oils inside the pot that prevents aluminum from leaching into your coffee and eliminates metallic flavors. Without seasoning, your first 5-10 brews will taste metallic, bitter, and unpleasant. The seasoning process takes only 2-3 hours total but makes a dramatic difference in coffee quality. Stainless steel moka pots benefit less from seasoning but should still undergo 2-3 initial brews to remove any manufacturing residue.
How many times should you season a moka pot?
Season your new moka pot 3-5 times before making coffee to drink. For most aluminum moka pots, 3 seasoning brews is sufficient to eliminate metallic taste. If you still taste metal after 3 brews, continue for 2 more rounds. Stainless steel moka pots typically need only 2-3 seasoning brews. Each seasoning brew should be discarded - use cheap or old coffee since you won't be drinking it. After the initial seasoning, your moka pot maintains its seasoning through regular use, and you never need to re-season it unless you accidentally wash it with soap or let it sit unused for 6+ months.
Can you use soap on a new moka pot?
Use soap only for the very first wash of a new moka pot to remove manufacturing oils and residue. After this initial cleaning, never use soap again. Soap strips away the protective coffee oil seasoning that builds up inside the pot, which is essential for preventing metallic taste and protecting the aluminum. For all subsequent cleanings, use only warm water and a soft cloth or sponge. The coffee oils that accumulate are beneficial and prevent oxidation. If you accidentally use soap after seasoning, you'll need to re-season the pot with 2-3 more brews. For the exterior and very stubborn stains, you can use a tiny amount of soap on outer surfaces only.
What coffee should I use for seasoning?
Use cheap, old, or expired coffee for seasoning since you'll be discarding every batch. Don't waste your premium beans on seasoning brews. Pre-ground supermarket coffee works perfectly, even if it's stale or past its prime. You can also use coffee grounds that are too old for regular drinking (over 4 weeks old). Any roast level works - light, medium, or dark. You need enough coffee to fill the filter basket completely for each of the 3-5 seasoning brews. For a 6-cup moka pot, expect to use about 100-150g of coffee total across all seasoning brews. Once seasoning is complete, switch to fresh, quality beans for your regular coffee.
How do you know when a moka pot is properly seasoned?
A properly seasoned moka pot shows these signs: 1) No metallic taste when you sip the coffee - it should taste clean with only coffee flavor. 2) The interior of the upper chamber develops a light brown patina (coffee oil coating) that doesn't wipe off easily. 3) No chemical or industrial smell when the pot is hot. 4) Coffee has full flavor without any harsh, tinny, or bitter metallic notes. 5) The aluminum surfaces look slightly darker and less shiny than when new. If you still taste metal after 3 brews, continue seasoning. Most people notice dramatic improvement after just 2-3 cycles. The patina will continue to develop and darken over months of regular use.
Can you season a stainless steel moka pot?
Yes, but stainless steel moka pots require less seasoning than aluminum ones. Stainless steel doesn't impart metallic taste as easily, so 2-3 seasoning brews are usually sufficient compared to 3-5 for aluminum. The purpose for stainless steel is primarily to remove manufacturing residue, oils, and any warehouse storage smells rather than preventing metallic leaching. Follow the same process: wash once with soap, then brew and discard 2-3 batches of cheap coffee. Stainless steel won't develop the same visible patina as aluminum, but it will still benefit from the initial seasoning. Some high-end stainless steel moka pots may only need 1-2 seasoning brews if they're thoroughly cleaned during manufacturing.
Final Thoughts
Seasoning your new moka pot is a simple but essential step that takes 2-3 hours and dramatically improves your coffee quality. Don't skip it. The difference between seasoned and unseasoned moka pot coffee is night and day.
Remember the key points:
- Wash with soap once, then never again
- Brew and discard 3-5 batches using cheap coffee
- Rinse with water only between brews
- Test after the 3rd brew to check for metallic taste
- Maintain seasoning by never using soap on interior surfaces
Once properly seasoned, your moka pot will produce delicious, full-bodied coffee for years. The patina will continue to develop and mature, actually improving the coffee flavor over time. Many Italian families use the same moka pot for decades, passing it down through generations - the ultimate testament to proper seasoning and care.