How to Make Macchiato at Home Without an Espresso Machine
Master the art of homemade macchiato with Marco's step-by-step guide. Learn traditional and iced caramel macchiato recipes using simple kitchen equipment and professional techniques.
Introduction: My Journey to Perfect Home Macchiato
I'll never forget the disappointment on my first attempt to recreate the perfect macchiato at home. Armed with nothing but a regular coffee maker and high hopes, I ended up with something that resembled brown water more than the velvety, espresso-forward drink I'd fallen in love with in Milan's historic Caffè Centrale. That failure sparked a mission that took me from the bustling coffee houses of Rome to the artisanal roasters of Seattle, searching for the secret to making authentic macchiato without expensive espresso equipment.
After years of experimentation and countless conversations with baristas around the world, I've cracked the code. The truth is, you don't need a $2,000 espresso machine to create café-quality macchiato at home. With the right techniques, simple equipment, and understanding of what makes a true macchiato special, you can craft this beloved Italian classic in your own kitchen—whether you prefer the traditional "spotted" espresso or the popular iced caramel variation.
In this comprehensive guide, I'll share everything I've learned about making macchiato without an espresso machine. From creating concentrated coffee that rivals true espresso to mastering the art of milk foam, these techniques will transform your home coffee game. Whether you're a coffee enthusiast looking to expand your skills or someone who simply wants to save money on café visits, this guide will give you the confidence to create consistently delicious macchiato at home.
Quick Success Tip
The key to great macchiato isn't the machine—it's understanding the balance between strong coffee, properly textured milk, and timing. Master these fundamentals, and you'll create better macchiato than many coffee shops!
Understanding Macchiato: What Makes It Special
Traditional vs. Modern Macchiato
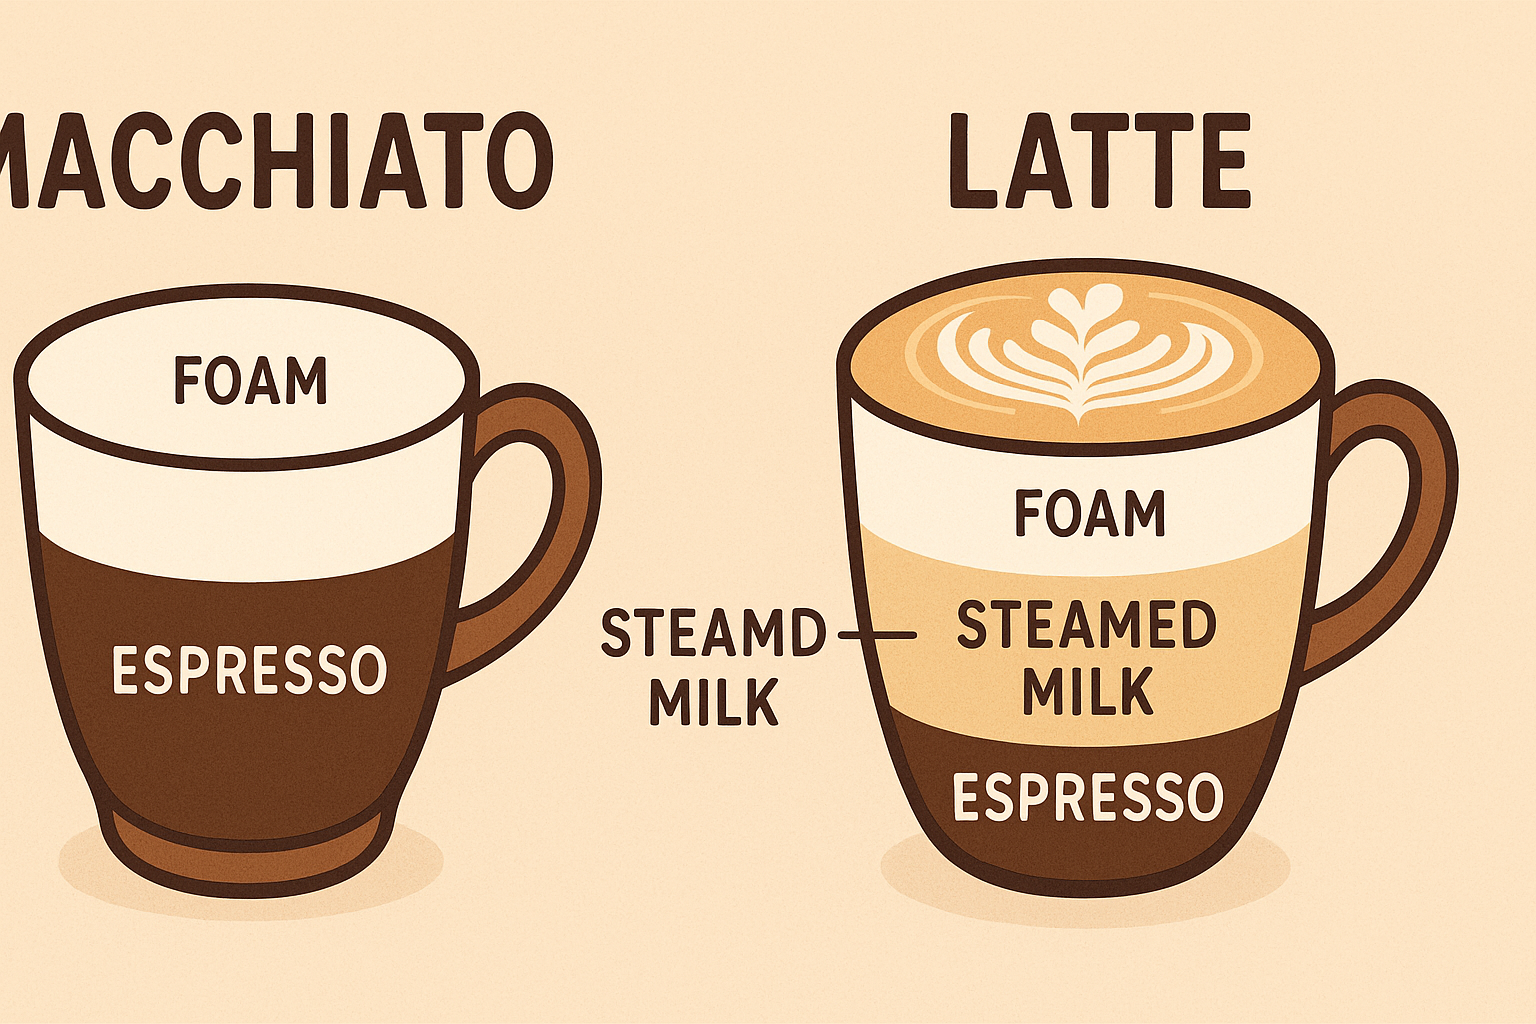
Before we dive into making macchiato at home, it's crucial to understand what we're actually creating. The word "macchiato" comes from the Italian verb "macchiare," meaning "to stain" or "to spot." This perfectly describes the traditional macchiato: a shot of espresso "stained" with just a dollop of steamed milk foam.
However, the macchiato landscape has evolved significantly, especially in North America. Today, when most people think of macchiato, they're often picturing the sweet, caramel-laden iced drinks popularized by major coffee chains. While purists might argue these aren't "true" macchiatos, both versions have their place in the coffee world, and I'll teach you to make both.
Traditional Macchiato
- • 1-2 oz strong espresso base
- • 1-2 tablespoons steamed milk foam
- • No additional sweeteners
- • Served in small 3-4 oz cup
- • Consumed quickly while hot
Iced Caramel Macchiato
- • 2-3 oz strong coffee concentrate
- • 6-8 oz cold milk or milk alternative
- • Caramel sauce for flavoring
- • Served over ice in tall glass
- • Often topped with whipped cream

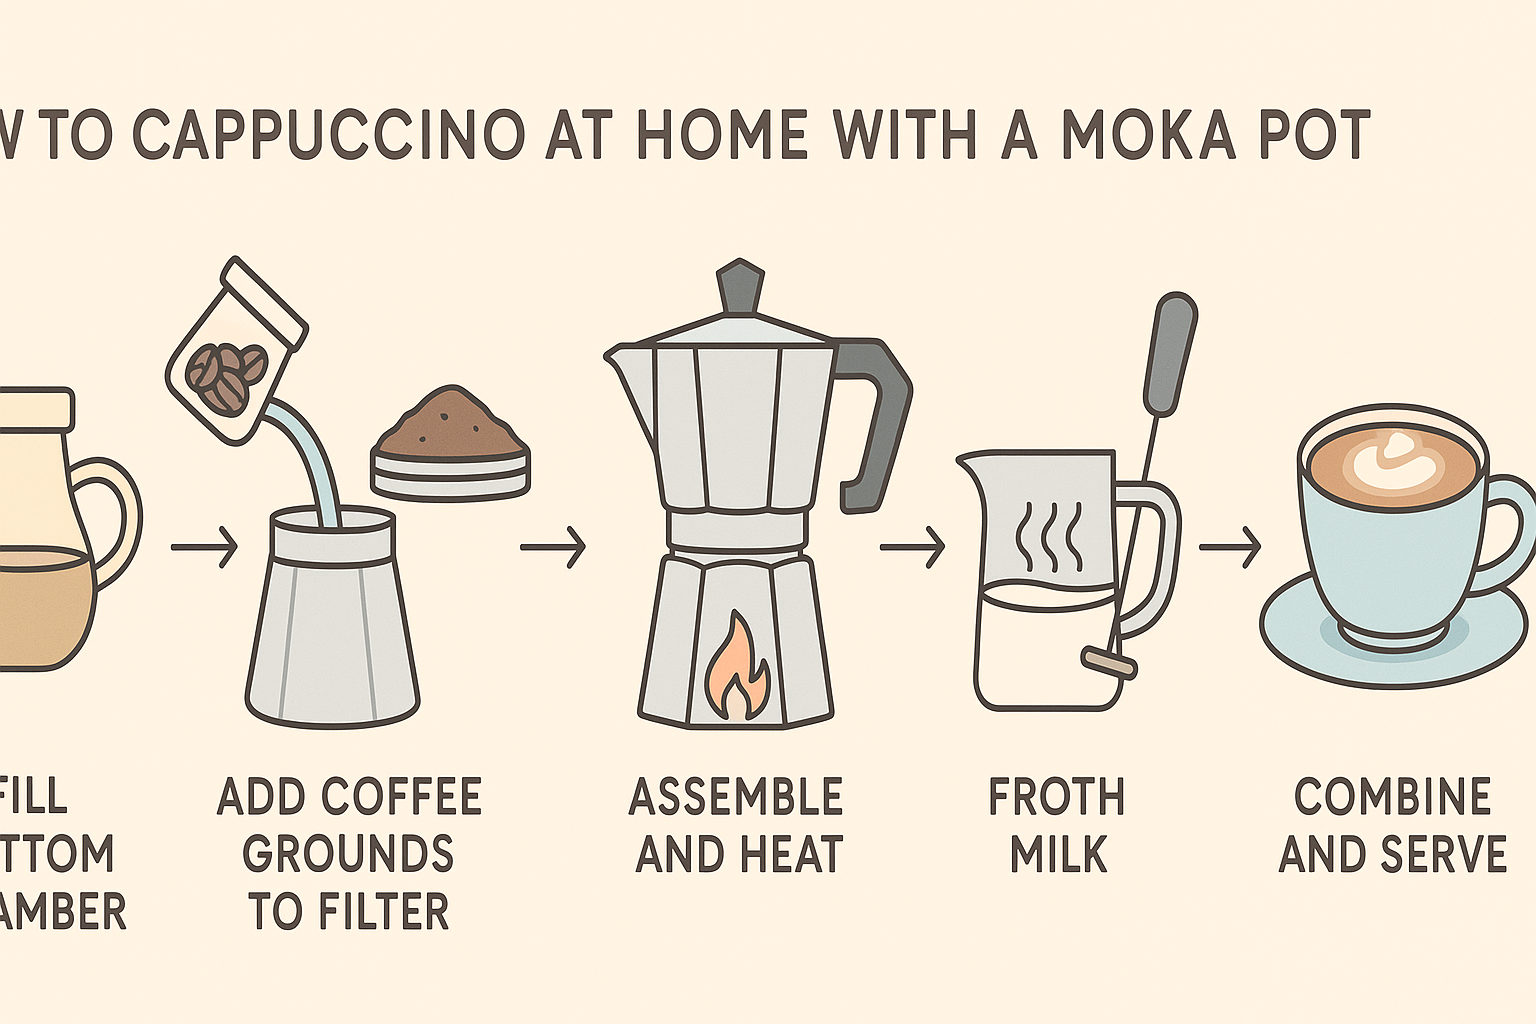
Complete visual guide to the macchiato making process from equipment to finished drink
The Science Behind Great Macchiato
Creating exceptional macchiato at home requires understanding the science behind what makes it work. The magic happens in the contrast—the bold, slightly bitter espresso base balanced by the sweet creaminess of milk. This contrast is achieved through three key elements:
The Macchiato Trinity
- Coffee Concentration: Your coffee base must be 2-3 times stronger than regular drip coffee to maintain flavor integrity when mixed with milk.
- Milk Temperature and Texture: For hot macchiato, milk should reach 150-160°F with microfoam consistency. For iced versions, cold milk provides the perfect temperature contrast.
- Layering Technique: The way you combine these elements determines whether you get a harmonious blend or a muddled mess.
Essential Equipment for Home Macchiato
One of the biggest misconceptions about making café-quality drinks at home is that you need expensive, professional equipment. While a high-end espresso machine certainly makes the process easier, I've perfected methods using common kitchen tools that produce remarkably similar results. Here's what you'll need:
Coffee Brewing Equipment (Choose One)
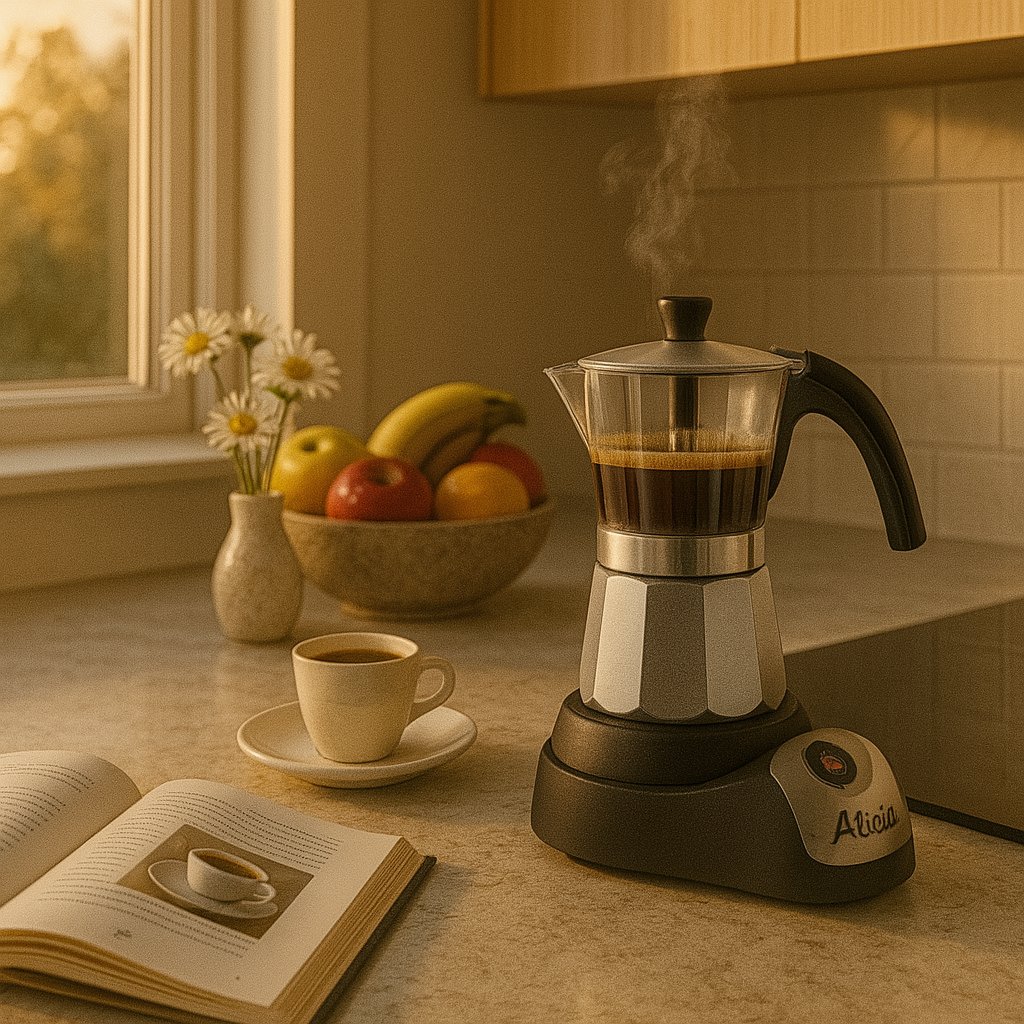
Option 1: Moka Pot (Recommended)
The moka pot is my top choice for creating espresso-like coffee at home. It produces concentrated, bold coffee with the pressure needed to create a rich flavor profile similar to espresso.
- 6-cup aluminum or stainless steel moka pot
- Produces coffee at about 1.5 bar pressure (vs. 9 bars for true espresso)
- Cost: $25-80 depending on brand and material
- Best for: Traditional hot macchiato
Option 2: AeroPress
The AeroPress offers excellent control over extraction and can produce concentrated coffee perfect for macchiato when used with the right technique.
- AeroPress with metal filter (optional but recommended)
- Produces clean, concentrated coffee
- Cost: $40-50
- Best for: Both hot and iced macchiato variations
Option 3: French Press (Concentrated Method)
While unconventional, a French press can create sufficiently strong coffee for macchiato when used with a special high-ratio brewing technique.
- 34 oz (1 liter) French press
- Requires specific brewing ratio and timing
- Cost: $20-60
- Best for: Large batches and iced macchiato
Milk Frothing Equipment
For Hot Macchiato
- French Press (Dual Purpose): Best method for creating microfoam
- Handheld Milk Frother: $15-25, quick and convenient
- Stovetop Milk Steamer: $30-50, most authentic results
- Mason Jar Method: Free if you have jars, requires practice
For Iced Macchiato
- No special equipment needed
- Cold milk (any percentage)
- Ice cubes
- Tall glasses (12-16 oz)
Additional Tools
- Digital Scale: Essential for consistent ratios (coffee shops measure everything!)
- Thermometer: For monitoring milk temperature (150-160°F is ideal)
- Fine-mesh Strainer: For filtering concentrated coffee if needed
- Small Whisk: Backup option for milk frothing
- Shot Glasses or Small Measuring Cups: For portion control
- Timer: Timing is everything in coffee preparation
Equipment Investment Priority
Start with a moka pot and French press for milk frothing—this $50 investment will let you make excellent macchiato. You can always upgrade individual components as you develop your preferences and skills.
Creating Espresso-Style Coffee Without a Machine
The foundation of any great macchiato is the coffee base. While we can't replicate the exact 9-bar pressure of commercial espresso machines, we can create concentrated coffee that delivers the bold flavor and body needed for exceptional macchiato. Here are three proven methods I've perfected:
Method 1: Moka Pot Concentrate (Recommended)
Perfect Moka Pot Coffee for Macchiato
Ratio: 1:8 (coffee to water) - much stronger than typical moka pot brewing
Grind: Fine, but not as fine as espresso (think table salt consistency)
Timing: 4-5 minutes total brewing time
Prepare Your Coffee and Water
Use 30g (about 6 tablespoons) of finely ground coffee and 240ml of filtered water. The high coffee-to-water ratio is crucial for achieving espresso-like concentration.
Fill and Assemble
Fill the bottom chamber with hot water just below the pressure valve. Add coffee to the filter basket, leveling but not packing it down. Screw the top chamber on firmly.
Control the Heat
Place on medium heat. When you hear the first gurgling sounds, reduce to low heat. This prevents over-extraction and bitterness while maintaining proper pressure.
Perfect Timing
Remove from heat when you hear a hissing sound—this indicates the water chamber is nearly empty. You should have about 120ml of concentrated coffee, perfect for 2-3 macchiatos.
Method 2: AeroPress Concentrate
AeroPress "Espresso" Technique
Ratio: 1:6 (coffee to water)
Grind: Fine-medium
Pressure: Slow, steady press over 30 seconds
Setup and Heat
Use 25g coffee to 150ml water at 200°F. Place AeroPress in inverted position for better control over steeping time.
Bloom and Steep
Add coffee, pour 50ml water, stir gently, and let bloom for 30 seconds. Add remaining water and steep for 1 minute total.
Press with Control
Flip onto your cup and press slowly over 30 seconds. The resistance should feel significant—this creates the pressure needed for concentrated extraction.
Pro Coffee Tip
Both methods should produce coffee that's bold enough to taste clearly through milk but not so bitter that it's unpalatable on its own. If your coffee tastes overly bitter, try a slightly coarser grind or shorter extraction time. If it's weak, increase the coffee-to-water ratio.
Mastering Milk Frothing Without Steam Wands
Creating properly textured milk is where many home macchiato attempts fall short. The goal isn't just to make bubbles—you want to create smooth, velvety microfoam that integrates seamlessly with your coffee. Here are the methods I've perfected for different equipment and preferences:
French Press Method (Best Results)
French Press Microfoam Technique
Milk Amount: 150ml for 2-3 macchiatos
Temperature: 150-160°F (warm to touch, not burning)
Milk Type: Whole milk (3.25% fat) for best foam
Heat the Milk
Pour milk into a small saucepan and heat gently while stirring. Use a thermometer if available—you want 150-160°F. The milk should be hot but not simmering.
Transfer and Pump
Pour hot milk into a clean French press. Insert the plunger and pump vigorously for 15-20 seconds. You'll see the milk double in volume and become creamy.
Rest and Swirl
Let the milk rest for 30 seconds, then gently swirl the French press. This integrates the foam and creates that perfect microfoam texture.
Alternative Frothing Methods
Handheld Frother
- • Heat milk to 150-160°F
- • Insert frother and turn on
- • Move in up-and-down motion for 20-30 seconds
- • Creates good foam but less microfoam texture
Mason Jar Method
- • Heat milk and pour into large mason jar
- • Fill jar only 1/3 full to allow for expansion
- • Screw on lid and shake vigorously for 60 seconds
- • Remove lid and microwave for 30 seconds to stabilize foam
Temperature Is Critical
Overheated milk (above 170°F) will taste burnt and won't foam properly. Underheated milk won't create stable foam. Invest in a simple kitchen thermometer—it's the difference between good and great macchiato.
Traditional Hot Macchiato Recipe
The traditional macchiato is a study in balance and restraint. This isn't a milky drink—it's espresso enhanced by just enough steamed milk to round out the edges while preserving the coffee's bold character. Here's how to create the authentic version at home:
Classic Italian Macchiato
Serving Size: 1 traditional macchiato (3-4 oz)
Prep Time: 5 minutes
Skill Level: Intermediate
Ingredients
- 60ml (2 oz) concentrated coffee - made using moka pot or AeroPress method
- 30ml (2 tablespoons) steamed milk - whole milk preferred for best texture
- Optional: 1/2 teaspoon sugar (traditional in some Italian regions)
Step-by-Step Instructions
Prepare Your Coffee
Brew your concentrated coffee using your preferred method. For moka pot, you want about 60ml of strong, rich coffee. It should be bold enough to taste clearly but not bitter.
Heat and Froth Milk
While coffee is brewing, heat 30ml of milk to 150-160°F and create microfoam using your preferred method. You want smooth, velvety foam—not large bubbles.
Warm Your Cup
Pour hot water into a 3-4 oz cup or espresso cup, swirl it around, then empty. This prevents the coffee from cooling too quickly.
Assemble the Macchiato
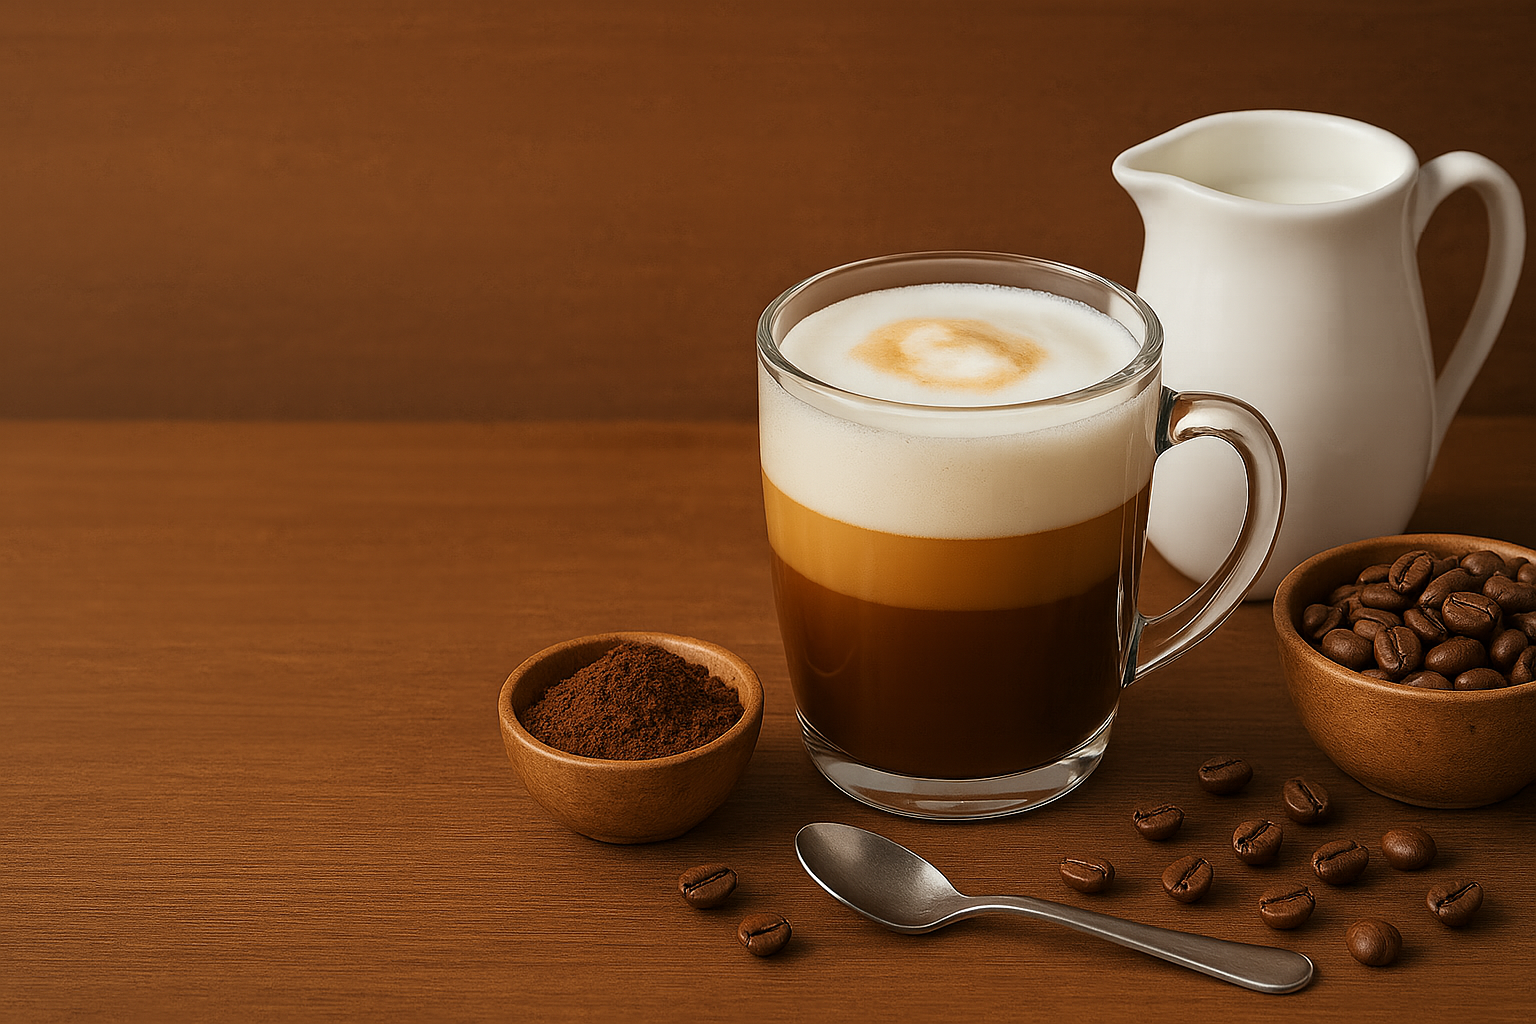
Pour the hot concentrated coffee into your warmed cup. Using a spoon, dollop the steamed milk foam on top, creating the characteristic "stain" or "spot" that gives macchiato its name.
Serve Immediately
Traditional macchiato is meant to be consumed quickly while hot. The contrast between the bitter coffee and sweet milk foam is most pronounced when fresh.
Presentation Tip
For café-style presentation, use a small spoon to hold back the liquid milk while allowing only the foam to spoon onto the coffee. This creates a more distinct "spot" and better visual contrast.
Iced Caramel Macchiato Recipe
The iced caramel macchiato is a completely different beast from its traditional Italian cousin, but no less delicious. This sweet, refreshing drink combines strong coffee with vanilla-flavored milk and rich caramel sauce, creating layers of flavor that change with each sip. Here's my perfected recipe:
Perfect Iced Caramel Macchiato
Serving Size: 1 large iced macchiato (16 oz)
Prep Time: 8 minutes
Skill Level: Beginner to Intermediate
Ingredients
- 90ml (3 oz) concentrated coffee - cooled to room temperature
- 240ml (1 cup) cold milk - any percentage, though 2% works best
- 2 tablespoons vanilla syrup - store-bought or homemade
- 2-3 tablespoons caramel sauce - divided
- 1 cup ice cubes
- Optional: Whipped cream for topping
Step-by-Step Instructions
Prepare the Coffee Base
Brew concentrated coffee using your preferred method and let it cool to room temperature. For speed, you can pour it over a few ice cubes in a separate container, then strain out the ice.
Create the Vanilla Milk Base
In a tall 16 oz glass, combine cold milk with vanilla syrup. Stir well to ensure the syrup is fully incorporated. This sweetened milk forms the base layer of your macchiato.
Add Ice and Caramel
Fill the glass with ice cubes, leaving about 2 inches from the top. Drizzle 1 tablespoon of caramel sauce around the inside of the glass, creating decorative streaks.
Layer the Coffee
Slowly pour the cooled concentrated coffee over the back of a spoon held just above the milk. This creates distinct layers—the coffee will float on top of the denser, sweetened milk.
Finish with Caramel
Drizzle the remaining caramel sauce over the top in a crosshatch pattern. Add whipped cream if desired, then finish with a final drizzle of caramel.
Layering Success Secret
The key to perfect layers is density differences. The vanilla syrup makes the milk denser than the coffee, allowing for natural layering. Don't stir until you're ready to drink—the layers changing as you sip is part of the experience!
Homemade Vanilla Syrup Recipe
Quick Vanilla Syrup
Ingredients: 1/2 cup sugar, 1/2 cup water, 1 teaspoon vanilla extract
Method: Combine sugar and water in a saucepan, bring to a boil, stir until sugar dissolves. Remove from heat, add vanilla. Cool completely before using. Stores in refrigerator for up to 1 month.
Troubleshooting Common Issues
Even with the best instructions, making perfect macchiato at home involves a learning curve. Here are the most common issues I encounter when teaching people these techniques, along with practical solutions:
Coffee-Related Problems
❌ Problem: Coffee tastes too weak or watery
Causes: Coffee-to-water ratio too low, grind too coarse, extraction time too short
Solutions:
- Increase coffee amount by 10-20%
- Use a finer grind setting
- Extend brewing time by 30-60 seconds
- Check if your coffee beans are fresh (within 2-4 weeks of roast date)
❌ Problem: Coffee tastes bitter or over-extracted
Causes: Grind too fine, water too hot, over-extraction
Solutions:
- Use slightly coarser grind
- Reduce brewing time
- Lower water temperature to 195-200°F
- Clean your equipment—coffee oils can cause bitterness
Milk Frothing Issues
⚠️ Problem: Milk won't foam or foam disappears quickly
Causes: Low-fat milk, temperature issues, old milk
Solutions:
- Use whole milk (3.25% fat) for best results
- Ensure milk is fresh (check expiration date)
- Heat to exactly 150-160°F—use a thermometer
- Clean all equipment thoroughly—soap residue prevents foaming
⚠️ Problem: Foam is too thick or bubbly
Causes: Over-frothing, wrong technique
Solutions:
- Reduce frothing time by 30-50%
- Let foam settle for 30 seconds, then swirl gently
- Tap container on counter to break large bubbles
- Pour foam through a fine-mesh strainer if necessary
Assembly and Presentation Problems
ℹ️ Problem: Iced macchiato layers don't form properly
Causes: Coffee too hot, pouring too fast, insufficient density difference
Solutions:
- Ensure coffee is completely cooled before layering
- Pour very slowly over the back of a spoon
- Increase vanilla syrup in milk to create more density difference
- Use a taller, narrower glass for better layer visibility
ℹ️ Problem: Traditional macchiato cools too quickly
Causes: Cold cup, small serving size, room temperature
Solutions:
- Always warm your cup with hot water first
- Serve immediately after preparation
- Use thicker ceramic cups that retain heat better
- Consider making a slightly larger portion (but maintain coffee-to-milk ratio)
Improvement Strategy
Keep notes on what works and what doesn't. Small adjustments in grind size, timing, or ratios can make huge differences. Most café baristas make hundreds of drinks before achieving consistency—give yourself time to practice!
Conclusion: Your Home Macchiato Mastery Journey
Creating exceptional macchiato at home without an espresso machine isn't just possible—it's incredibly rewarding. Through my years of experimentation and refinement, I've discovered that the fundamentals of great macchiato have less to do with expensive equipment and more to do with understanding the principles: concentrated coffee, properly textured milk, and precise timing.
Whether you've chosen to master the traditional Italian macchiato with its bold simplicity or fallen in love with the sweet complexity of iced caramel macchiato, you now have the knowledge and techniques to create café-quality drinks in your own kitchen. The methods I've shared—from moka pot concentration to French press milk frothing—have been tested and refined through countless iterations and teaching sessions.
Remember that perfection comes with practice. Your first few attempts might not match the precise flavor profiles you're aiming for, and that's completely normal. Every professional barista started exactly where you are now, making adjustments, learning from mistakes, and gradually developing muscle memory for timing and technique.
The beauty of making macchiato at home extends beyond just the cost savings, though creating café-quality drinks for under $2 each certainly adds up over time. It's about having complete control over your coffee experience—adjusting sweetness levels, experimenting with different milk alternatives, or creating your own signature variations. You're not just making coffee; you're developing a skill that connects you to centuries of coffee craftsmanship.
As you continue this journey, don't hesitate to experiment beyond these base recipes. Try different coffee origins to see how they affect flavor profiles, experiment with alternative milks like oat or almond, or create your own flavored syrups. The techniques you've learned here provide a solid foundation for endless creativity.
Most importantly, share your creations. Invite friends over for a home café experience, teach family members your newfound skills, or simply enjoy the satisfaction of sipping a perfectly balanced macchiato that you created from start to finish. The journey from coffee novice to home macchiato master is one worth celebrating—one perfectly layered, beautifully crafted drink at a time.