How to Make Cappuccino at Home with a Moka Pot
Master the art of creating café-quality cappuccino at home using your moka pot. Learn Marco's professional techniques for perfect milk frothing and espresso-like extraction.
Marco Romano
Global Coffee Expert & Home Barista Specialist
From Roman espresso bars to home coffee mastery
The morning I couldn't get my usual cappuccino from the broken espresso machine at my favorite Roman café changed everything. The barista, Giuseppe, shrugged and said, "Marco, try making it at home with your moka pot." I laughed at first – how could a simple stovetop device create the creamy, perfectly balanced cappuccino I craved?
That challenge launched my journey into home cappuccino making, taking me from frustrated coffee lover to someone who can create café-quality cappuccino in any kitchen. Through years of experimentation across three continents and countless failed attempts, I've perfected techniques that transform your humble moka pot into a cappuccino-making powerhouse.
While true cappuccino traditionally requires espresso pressure, the moka pot cappuccino method I'll share creates a remarkably similar experience. You'll learn how to extract concentrated coffee with rich crema, create silky microfoam, and combine them into a cappuccino that rivals your favorite café – all without spending thousands on espresso equipment.
Understanding the Perfect Cappuccino
Before diving into technique, let's establish what makes a cappuccino exceptional. This isn't just coffee with hot milk – it's a precisely balanced drink with specific proportions and textures that create harmony between coffee strength and creamy smoothness.
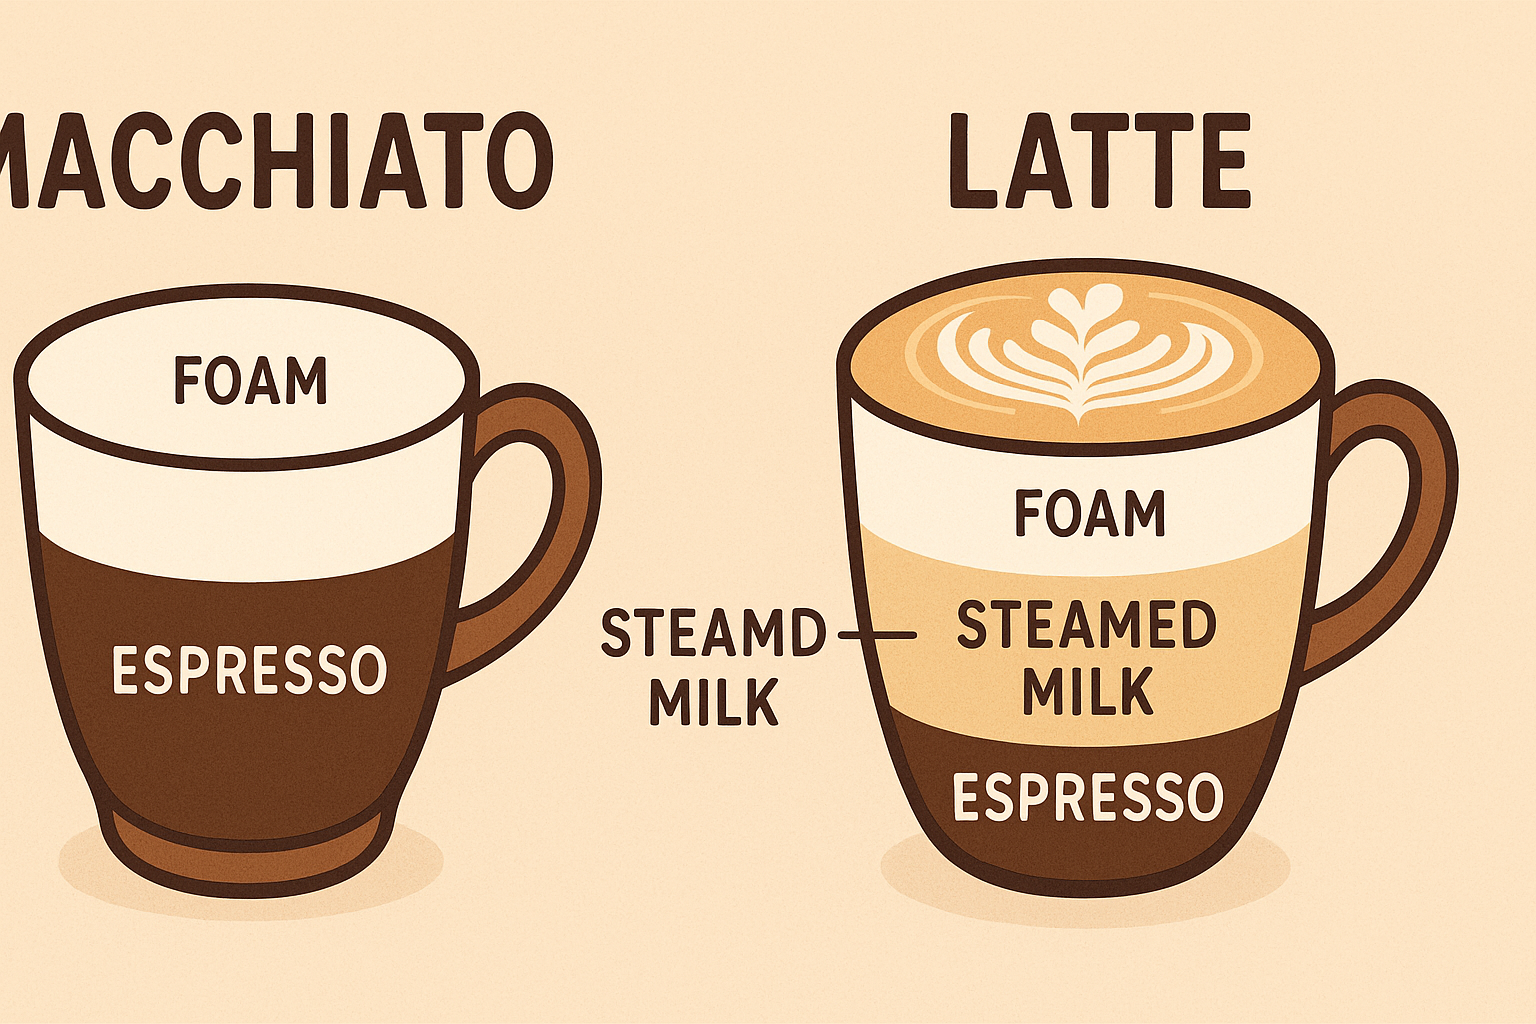
Traditional Cappuccino Anatomy
1/3 Espresso Base
- • 1-2 oz concentrated coffee
- • Rich crema on top
- • Strong flavor foundation
- • Proper extraction timing
1/3 Steamed Milk
- • 2-3 oz hot milk (150-160°F)
- • Silky, flowing texture
- • Minimal air incorporation
- • Uniform consistency
1/3 Milk Foam
- • Dense microfoam layer
- • Velvety, paint-like texture
- • No large bubbles
- • Insulates and flavors
How Moka Pot Coffee Differs from Espresso
Let me be honest: moka pot coffee isn't espresso. But it's closer than any other home brewing method, and with the right techniques, you can create cappuccino that satisfies even discerning palates. The key is understanding and compensating for the differences.
Marco's Reality Check
"Moka pot coffee has about 1-2 bars of pressure compared to espresso's 9 bars. This means less crema, different texture, and varying extraction. But here's the secret: by adjusting grind size, water temperature, and timing, we can create concentrated coffee that works beautifully in cappuccino."
Texture and Temperature Goals
Perfect cappuccino isn't just about ratios – it's about achieving specific textures and temperatures that create the iconic drinking experience. Here's what we're aiming for:
Ideal Textures
- • Coffee Base: Rich, syrupy consistency
- • Steamed Milk: Glossy, flowing like wet paint
- • Foam: Dense enough to hold latte art
- • Integration: Smooth blending when stirred
Critical Temperatures
- • Coffee: 160-170°F (ideal serving temp)
- • Milk: 150-160°F (sweet spot for foam)
- • Final Drink: 140-150°F (comfortable drinking)
- • Warning: Above 170°F scalds milk proteins
Essential Equipment for Home Cappuccino
The beauty of moka pot cappuccino is that you probably already own most of the necessary equipment. Let me break down what's essential, what's helpful, and what you can substitute based on my experience across different kitchen setups.
Must-Have Equipment
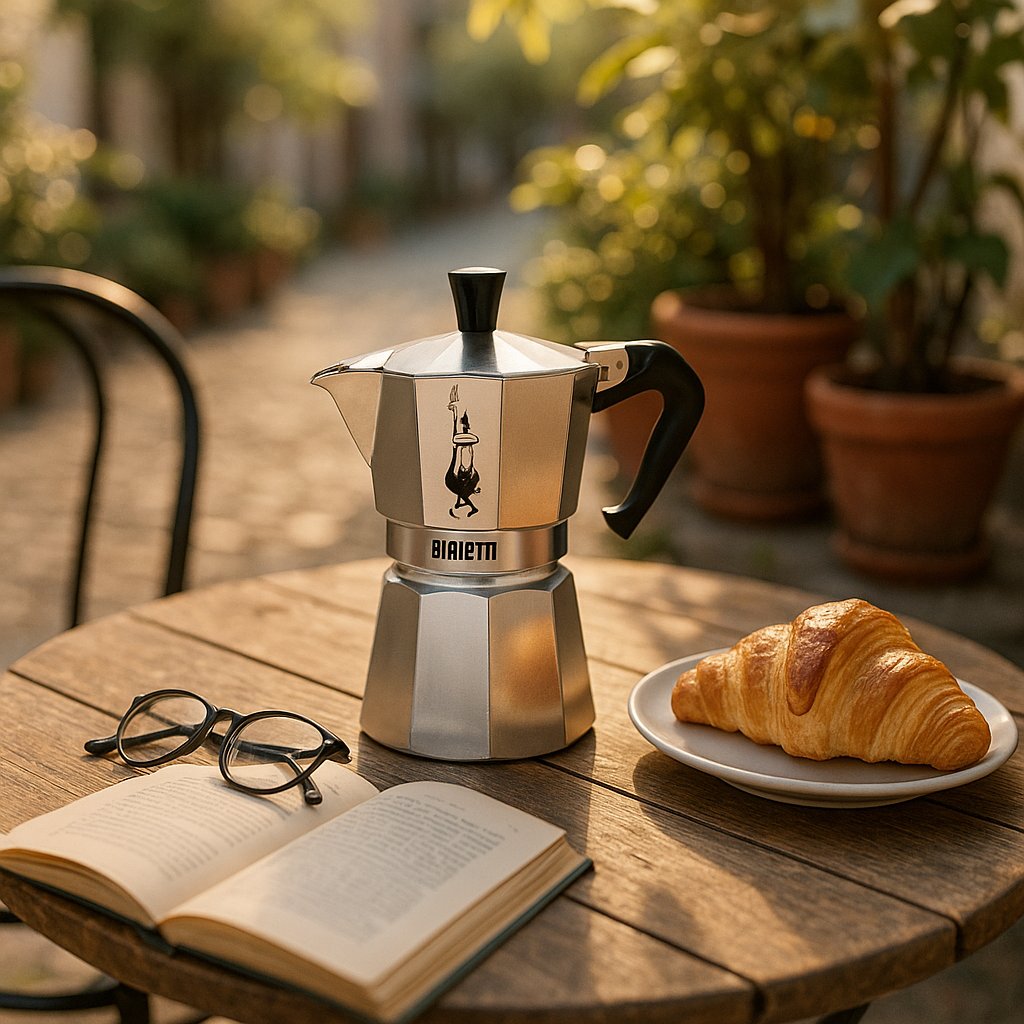
Moka Pot (3-6 cup capacity recommended)
The foundation of our cappuccino. Size matters here – too small and you don't get enough coffee; too large and you waste ingredients for single servings.
Marco's Choice: 3-cup Bialetti Moka Express for single cappuccino, 6-cup for serving two people or having some coffee left over.
Milk Thermometer
Temperature control is crucial for proper milk frothing. Digital instant-read thermometers work best for quick, accurate readings.
Temperature Range: Look for thermometers that read 100-200°F accurately. The 150-160°F sweet spot is critical for microfoam.
Milk Frothing Tool
Multiple options work here. I'll rank them by effectiveness for home cappuccino making.
Best Options
- • French press (my favorite)
- • Handheld milk frother
- • Mason jar with tight lid
Adequate Options
- • Wire whisk (lots of elbow grease)
- • Immersion blender (careful with splashing)
- • Electric milk frother
Helpful Additions
Quality of Life Upgrades
- • Kitchen Scale: Precise coffee-to-water ratios
- • Timer: Consistent extraction timing
- • Burr Grinder: Fresh-ground coffee makes a difference
- • Preheated Cups: Maintains serving temperature
Professional Touches
- • Milk Pitcher: Better pour control and frothing
- • Latte Art Tools: Toothpicks for simple designs
- • Small Saucepan: More controlled milk heating
- • Fine Strainer: Removes large bubbles from foam
Ingredient Quality Matters
Equipment is only half the battle. The quality of your coffee and milk dramatically impacts your final cappuccino. Here's what I've learned makes the biggest difference:
Ingredient Selection Guide
Step-by-Step Cappuccino Recipe
This is the method I've refined through hundreds of cappuccinos, incorporating techniques learned from Italian baristas, German precision, and American innovation. Follow these steps exactly at first, then adjust to your taste preferences.
Perfect Moka Pot Cappuccino Recipe
Timing
- • Prep time: 3 minutes
- • Brewing time: 5-7 minutes
- • Milk frothing: 2-3 minutes
- • Total time: 12 minutes
Measurements
- • Coffee: 20g (2-3 tablespoons)
- • Water: 150ml (2/3 cup)
- • Milk: 120ml (1/2 cup)
- • Final serving: 6-8 oz
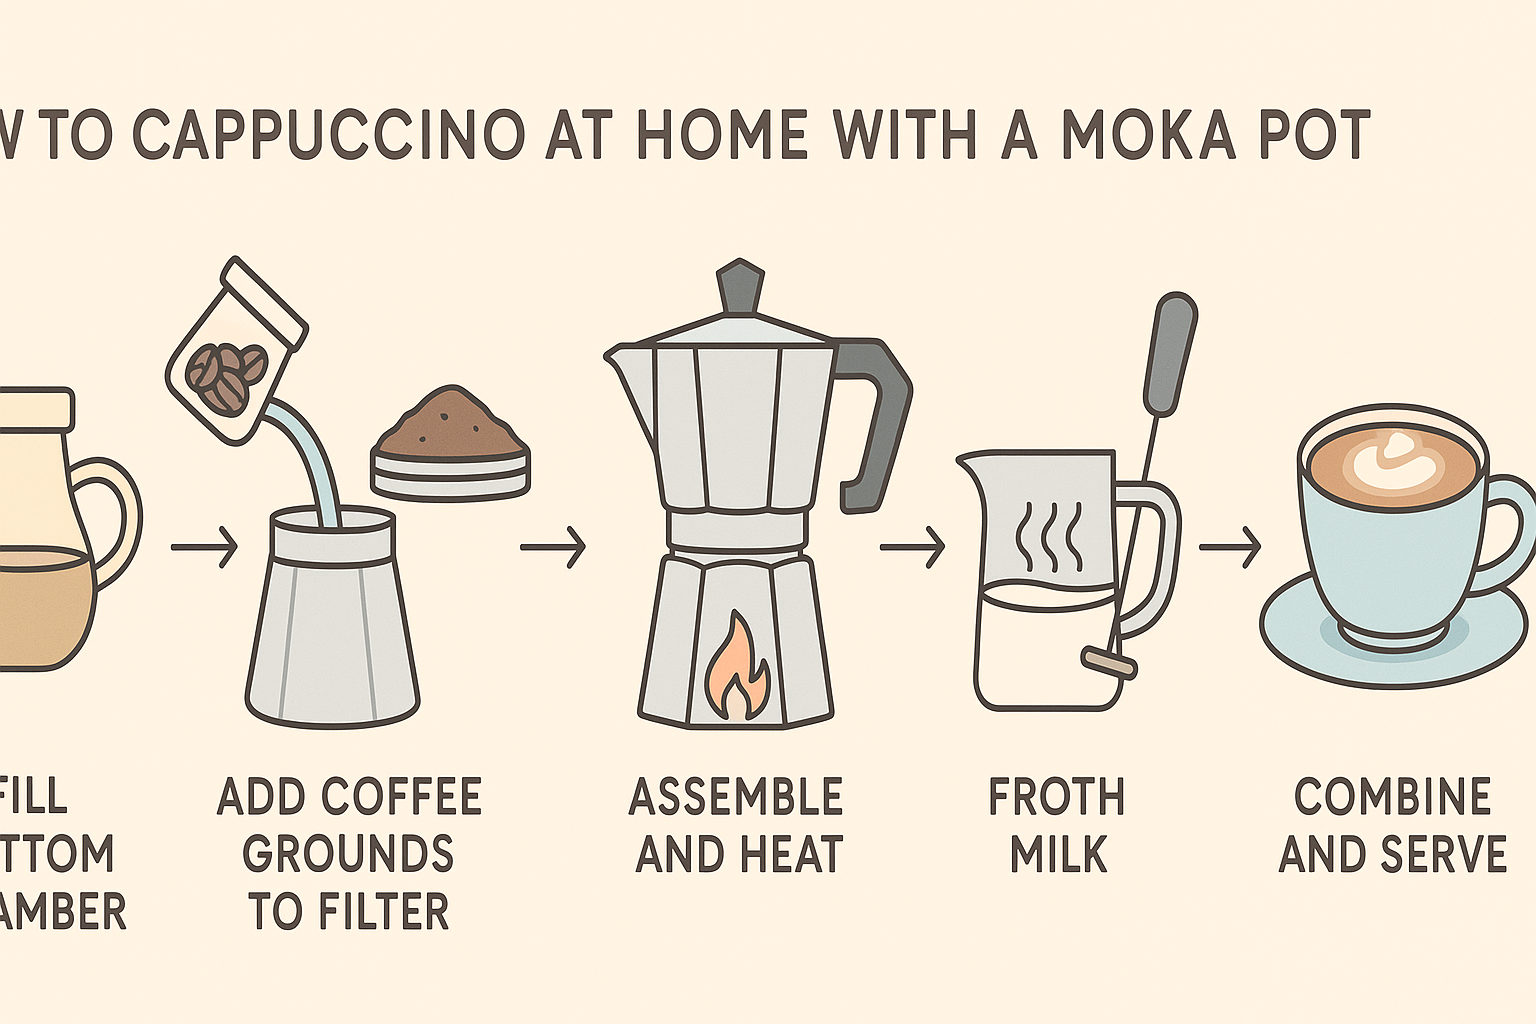
Part 1: Preparing the Coffee Base
Prepare the Moka Pot
Fill the bottom chamber with filtered water up to the safety valve. Use water that's room temperature or slightly warm – not hot, as this can create over-extraction.
Pro Tip: The water level should never cover the safety valve. This valve prevents pressure buildup and ensures proper extraction.
Add Coffee and Assemble
Fill the filter basket with freshly ground coffee, leveling gently without tamping. Screw the top and bottom chambers together firmly but not over-tight.
Grind Size: Medium-fine, similar to table salt. Too fine and it'll over-extract; too coarse and you'll get weak coffee.
Start Brewing
Place on medium-low heat. Keep the lid open to monitor the brewing process. You'll hear gurgling when coffee starts emerging.
Listen for: Initial sputtering means brewing has started. When gurgling becomes constant and violent, remove from heat immediately to prevent bitter over-extraction.
Part 2: Creating Perfect Milk Foam
While your coffee brews, start preparing the milk. Timing is crucial here – you want both components ready simultaneously for the best temperature and texture combination.
Heat the Milk
Pour 120ml of cold whole milk into a small saucepan. Heat over medium-low heat, stirring occasionally, until it reaches 150-160°F. Use your thermometer for accuracy.
Critical Warning: Above 170°F, milk proteins denature and you'll get a burnt taste. Below 140°F won't create stable foam.
Create Microfoam (French Press Method)
Pour heated milk into a French press. Insert plunger and pump vigorously for 30-45 seconds. The milk should double in volume and have a glossy, paint-like texture.
Alternative Methods: Mason jar (shake for 60 seconds) or handheld frother (30-45 seconds). Goal is dense microfoam, not large bubbles.
Settle and Separate
Let frothed milk sit for 30 seconds. Gently tap container to break large bubbles. The milk should separate into steamed milk at bottom and dense foam on top.
Quality Check: Good microfoam looks glossy and flows like wet paint when you swirl the container. Large bubbles indicate over-aeration.
Part 3: Assembly and Presentation
Pour the Coffee Base
Pour the concentrated moka pot coffee into a preheated 6-8 oz cup. Fill about 1/3 of the cup. The coffee should have a rich, dark color with some foam on top.
Temperature Tip: If your coffee has cooled too much, quickly reheat by returning the moka pot to low heat for 30 seconds.
Add Steamed Milk
Hold back the foam with a spoon and pour steamed milk into the coffee, filling another 1/3 of the cup. Pour slowly from a height of 2-3 inches for better integration.
Pouring Technique: Start high and finish low for optimal mixing. The milk should blend with coffee creating a lighter brown color.
Top with Foam
Spoon the dense microfoam on top, filling the final 1/3 of the cup. The foam should sit in a dome shape and have a velvety appearance.
Final Touch: Optional dusting of cocoa powder or cinnamon. For simple latte art, use a toothpick to create heart or leaf patterns.
Troubleshooting Common Issues
Even with perfect technique, cappuccino making has its challenges. I've encountered every possible problem in my journey from frustrated beginner to confident home barista. Here are the most common issues and their solutions:
Coffee-Related Problems
Coffee Too Weak or Watery
Causes: Grind too coarse, not enough coffee, heat too high causing fast extraction
Solutions: Use finer grind, increase coffee amount by 25%, lower heat setting
Coffee Too Bitter or Burnt
Causes: Grind too fine, over-extraction, heat too high, leaving on heat too long
Solutions: Coarser grind, remove from heat at first gurgle, medium-low heat setting
No Pressure or Slow Brewing
Causes: Grind too fine blocking water flow, gasket problems, loose assembly
Solutions: Check grind size, ensure tight assembly, inspect gasket for damage
Milk Frothing Problems
Milk Won't Foam or Creates Large Bubbles
Causes: Milk too hot/cold, wrong fat content, dirty equipment, over-frothing
Solutions: Use whole milk at 150-160°F, clean all equipment thoroughly, shorter frothing time
Foam Disappears Quickly
Causes: Milk overheated, insufficient protein content, foam too airy
Solutions: Lower temperature, use fresh whole milk, aim for denser microfoam
Foam Too Dense or Won't Pour
Causes: Over-frothing, temperature too low, wrong technique
Solutions: Shorter frothing time, increase temperature slightly, gentle tapping to settle
Assembly and Presentation Issues
Marco's Troubleshooting Checklist
- Temperature Mismatch: Both coffee and milk should be hot (150-170°F) when combined
- Timing Problems: Coffee and milk ready at different times leads to temperature loss
- Ratio Issues: Stick to 1:1:1 ratio until you master the technique, then adjust to taste
- Equipment Cleanliness: Milk residue prevents proper frothing; coffee oils create bitter flavors
- Ingredient Quality: Stale coffee or old milk dramatically impact final result
Advanced Techniques and Variations
Once you've mastered the basic technique, there's a world of refinement and creativity waiting. These advanced methods can elevate your home cappuccino from good to exceptional, drawing on techniques I've learned from professional baristas worldwide.
Professional Milk Frothing Techniques
Double-Heat Method
Heat milk to 140°F, froth, then gently reheat to 160°F while swirling. This creates incredibly stable microfoam.
- • More stable foam structure
- • Better integration with coffee
- • Requires careful temperature monitoring
- • Extra time but superior results
Cold Milk Start
Start with very cold milk (35-40°F), froth first, then heat while continuing to agitate gently.
- • Creates denser initial foam
- • Better volume retention
- • Requires precise timing
- • Professional technique adaptation
Coffee Enhancement Techniques
Pressure Optimization Methods
Creative Cappuccino Variations
Vanilla Cinnamon Cappuccino
Add 1/4 teaspoon vanilla extract to milk before frothing, dust with cinnamon after foam application. This creates a warming, dessert-like experience perfect for cold mornings.
Marco's Tip: Use real vanilla extract, not imitation. The flavor difference is remarkable, and it integrates better with milk proteins.
Honey Lavender Cappuccino
Infuse milk with dried culinary lavender (steep for 2 minutes, strain), sweeten with honey instead of sugar. Creates an aromatic, sophisticated flavor profile.
Caution: Use food-grade lavender only, and sparingly – too much creates a soapy taste. Start with 1/4 teaspoon per cup of milk.
Spiced Mocha Cappuccino
Add 1 tablespoon cocoa powder and pinch of cayenne to coffee grounds before brewing. Creates a Mexican hot chocolate inspired cappuccino with gentle heat.
Spice Balance: Start with just a tiny pinch of cayenne – you can always add more, but you can't take it back. The heat should be a gentle warmth, not fire.
Presentation and Latte Art
While complex latte art requires espresso machine steam wands, you can create simple, elegant designs with your moka pot cappuccino using basic tools and techniques.
Simple Heart
Use toothpick to draw through foam from edge to center
Basic Leaf
Draw lines perpendicular to center line for leaf pattern
Concentric Circles
Drop cocoa powder through stencil for geometric patterns
Your Journey to Cappuccino Mastery
Learning to make exceptional cappuccino at home with a moka pot isn't just about saving money or convenience – it's about understanding coffee as a craft, developing your palate, and creating moments of daily luxury that rival the best café experiences.
Key Takeaways for Success
Remember Giuseppe's challenge that started my moka pot cappuccino journey? He was right – you don't need a $3,000 espresso machine to create drinks that satisfy your coffee cravings. With practice, patience, and attention to detail, your home cappuccino can become the highlight of your morning routine.
Start with the basic recipe I've shared, master the fundamentals, then begin experimenting with variations and advanced techniques. Every failed attempt teaches you something new about temperature, timing, or technique. Soon, you'll develop the intuition that separates good home baristas from great ones.
"The best cappuccino isn't the one that perfectly replicates café standards – it's the one that brings you joy every morning and makes your kitchen feel like your favorite coffee shop."